Feeds:
Posts
Comments

Posts Tagged ‘garlic’

Woah, it’s been quite a whilst since my last blog, and for that I can only apologise! You may have noticed last week that there were a few guest blogs, and I hope you enjoyed them, and I did plan to return to blogging on the Friday, but unfortunately fate was determined to get me to diet somehow, and I ended up with gastroenteritis, which meant from Wednesday-Saturday I spent all day in bed, crying with pain of my kidneys trying to get rid of the nasty bug that decided to stop me eating for three whole days!!! As I said, my body was determined to get me on some kind of diet, and restore a normal sleeping pattern, and decided illness was the way forward.

Now of course, that doesn’t excuse me for no blog posts this week, but to be honest, I was still nibbling at comfort food most of this week! After being so ill, going back to food is like learning to eat again, you’re not sure what you like, so you end up sticking to bland things. However, all is better now, and on Tuesday I received a comment on my blog from a lovely researcher at ITV on my “About Punkchef” page, asking me if I would like to apply for Britain’s Best Dish! Of course I would, I was born to be a star, sweetie darlings!! I may have a face for radio, but that’s not going to stop me trying to interfere with your reception, and hopefully soon my beaming fizzog will be staring at people all across the country, so apologies in advance!

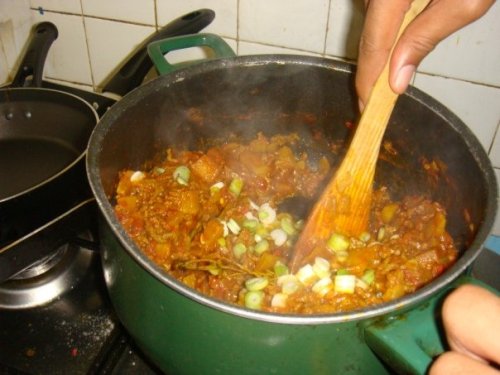
So after speaking to the people on the telephone, I had to decide what recipe I should use, should it be one I’ve already shared on the blog, the chicken and leek pie?, the mint and white chocolate mousse?, or should I do my as of yet, undocumented Chilli Con Carne? A recipe which I’ve been developing for quite some time, each time I make it I add something different, just to enhance it. “Yes!” I exclaimed, whilst sat alone in my room, to nobody, “I shall make the chilli”.

My audition is tomorrow, so please feel free to leave good luck comments. Here is the recipe, and I would like to point out, that even though it has a wide amount of spices, particularly chillies, it is not too spicy, my opinion on Chilli Con Carne, is that it’s an earthy dish first, and a spicy dish second!! The emphasis, for me, is on earthy flavours.

The Best? Chilli Con Carne

Ingredients :

  • 1kg pork mince
  • 2 cooking chorizo sausages, diced
  • 1 large spanish onion, diced
  • 3 cloves garlic, minced
  • 1 and 1/2 chipotle chillies, finely chopped, or tbsp dried chipotle flakes
  • 3tbsp cumin
  • 2tbsp chilli powder
  • 1tbsp smoked sweet paprika
  • 6 slices of pickled jalapeños, finely chopped
  • 1 large fresh green chilli, finely chopped (seeds removed)
  • 1 tin good quality chopped tomatoes
  • 1 tin pinto beans
  • 200ml red wine (I suggest something Spanish or Chilean, I used a Tempranillo, but a Rioja would also work brilliantly)
  • handful fresh coriander
  • 90%+ cocoa solids, dark chocolate
  • zest of 2 limes, juice of 1 lime
  • salt
  • pepper
  • corn or vegetable oil

Method :

  1. Add the chorizo sausage to a pan, and fry in a little vegetable oil to release spices and fats in the sausage, strain and reserve chorizo.
  2. Add the onion to the flavoured oil, and sweat over a low heat, until they have reduced to half their original volume.
  3. Add the minced garlic to the onions, and the paprika, and continue to sweat for another 10 minutes.
  4. Once the onion is thoroughly cooked, add the chipotle chilli, and increase the heat, and fry off for a couple of minutes.
  5. Add the cumin and chilli powder to the onions, and fry until the spice catches the back of your throat when you breath in the aromas. This is how you know the dried spices have cooked.
  6. Return the chorizo to the onion and spice mixture, followed by the fresh chilli and jalapeños, and continue to cook over a high heat.
  7. Add the pork mince, and stir until browned, then add the wine, and leave the alcohol to cook off for a few minutes.
  8. Once the wine has cooked off, add a tin of chopped tomatoes, and a tin of pinto beans, and stir through.
  9. Chop the coriander and stir into the chilli, check for seasoning, adding salt and pepper.
  10. Grate 2-3 pieces of high quality, high cocoa percentage, dark chocolate into the chilli and allow to melt into the chilli.
  11. Finally, add the juice of a lime, and zest of 2 limes, check for seasoning once again (as the chocolate may contain a little sugar, which you may wish to combat with a little extra salt), and leave overnight, as this allows the flavours to mature.
  12. Serve with long grain rice, perhaps with some wild rice added to it.

As I said earlier in my blog, my recipe for chilli con carne focuses on the earthy flavours of cumin, and paprika, and good wine and chocolate, and although it does have a chilli kick, it’s not the main focus of the recipe. I know a lot of people claim to have “The best recipe for chilli con carne EVER”, but for a lot of people who make this claim, it’s just a synonym for “the most needlessly spicy recipe for chilli con carne EVER, where you won’t be able to taste anything else for days as your sensitive taste buds will have been rendered useless due to obscene amounts of capsicum”… and if you think I’m talking about your chilli con carne recipe here… I probably am.

Finally, I would like to add a MASSIVE, HUUUUGE “THANK YOU!!” to the very wonderful Paul Farley, the head chef at Hero Burrito, for donating me a can of chipotle chillies for my recipe, when Morrison’s decided that now would be a great time to stop selling them, which is a ball ache for me, as chipotle is a key ingredient in my recipe, and without it I would have been up a creek without a paddle! So go to their restaurant, or order a takeaway, and mention that you heard of them through me (even if you didn’t!! lol) and tell them I say thank you, again!!!

Hero Burrito : http://www.facebook.com/#!/group.php?gid=145411818243&ref=ts

Anyway, wish me luck for tomorrow!!

Kris.
Read Full Post »

Hello and welcome to the second instalment in my week of guest blogs, today we have my favourite London raggapunk, Asher from the Spontaneous Operatic blog, here to share with you food he grew up with, and still makes regularly to this day!

________________________________________________________

Groovin’ out on life: Jamaican Patties

Wow, would you look at that. You’ve just started reading a food blog written by a Northern punk with a palette for absolutely everything (except ready meals), and suddenly this other, completely unknown raggapunk urchin from the dirty South (… alright, London town) rocks up to spoil the party. My name’s Asher, and I’m black. I also like food. Confused yet? You shouldn’t be, really. I’m just guest-blogging as a means of doing something other than soul-destroying exams. Basically, I’m avoiding revision. Fun times.
Well, this week we have a sort of treat for you, I suppose. But it’s not really a treat, because you still have to make it yourself in order to eat it. But it’s quite easy, I mean… I can do it. And I can’t really do much of anything. This recipe is one from my childhood, I might have been born in London, but I’m more cultured than a rastaman wi’ dem drum ‘at inna’ yard drink a Guinness punch. If you didn’t understand that, basically, I can cook all the Jamaican food my mother used to make. And this week, I’ve made some Jamaican patties. Ease up now. Taken from a place even further south than me, Cornwall – the Cornish pasty – the Jamaican pattie is essentially a cross between the pastry Devon wishes it could make and the Caribbean equivalent of a burger. Only, it’s much tastier than both of these. Jamaican patties sell in Caribbean bakeries around the various “black” areas of London (such as Peckham, Brixton and Camberwell) for over £1 a pop. That’s a rip off, don’t pay those prices, you can make 20 or more, depending on how well you can roll the dough, for much less.
Ingredients :

For the pastry :
  • 450g Flour
  • 255g Butter
  • 6tbsp Water
  • 3tbsp Ground Turmeric/Haldi
  • 2tsp Salt
  • 1 egg or 100ml milk

For the filling :

  • 500g Mince (can be beef or lamb, I prefer lamb but I use beef because it doesn’t go stodgy and fatty when cold.)
  • 2 Pointed peppers (or several baby peppers – sweeter the better)
  • 1 Scotch bonnet chilli pepper (I sometimes use two, depends on how spicy you like it.)
  • 1 Large onion
  • 1 Garlic clove
  • 3-4 Scallions (Spring Onions)
  • Sprigs of thyme
  • Allspice/pimento seeds (I have them in a grinder)
  • Stock cube
  • 1 pint boiling water
  • Tomatoes
  • 3tbsp olive oil

Some things I add sometimes :

  • Grated root ginger
  • Jerk seasoning
  • Grated sweet potato

Method : (Delivered in Asher’s unique style!, Kris)

So, what you want to do after washing your hands is measure out your flour and add the turmeric and salt to it. Then sift it to get rid of the lumps. Leave the butter to rest on the side until it’s a bit softer, then cube it and add it to the flour mix. You can either work through it with your hands repeatedly (squeeze!) or you can be lazy and use a food processor. After I started making these at ridiculously industrial levels (I’m lying.. about 40 at a time), I started to favour the food processor, and it does get the pastry to a nice consistency. Once you’ve worked the flour and butter into breadcrumbs, add your water a bit at a time and knead it until it all sticks together. Or just add the water and blitz it in your food processor. Either way, if you find it’s too sticky, add some more flour, a bit at a time. If you find it’s not sticking together, slowly add some more water. Once it is ready, you’ll notice the ball of dough is a yellow colour. That’s the turmeric. It’s how people can tell you’ve made Jamaican patties, and not Cornish pasties. Racist? I think so. Wrap the dough up in clingfilm and put it in the fridge whilst you get on with this next bit.
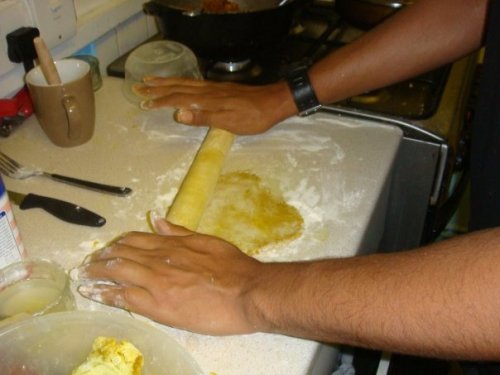
This is how the pastry should look when rolled out

This is how the pastry should look when rolled out

You’ll wanna’ clean the side and dry it – it will need to dry completely whilst your dough is standing in the fridge so that none of it gets stuck when you’re rolling it later. Oh, I forgot everyone else has massive kitchens with more than one side to use. Nevermind. What you’ll want to do next is heat your oil in a pan (I prefer a proper saucepan, you can do it in a frying pan or wok, but if you’re anything like me, it will fall out over the sides later). Once it’s smokin’ a lickle bit, reduce the heat and break up your mince. Put it in the pan. Hear that sizzle? Cry as it spits at you, then turn the heat down some more because that means it’s too high. Break up the mince in the pan with a spatula, make sure none of it clumps together – rubbery mince is horrible. Brown the mince slowly, but whilst keeping a close eye on it, chop up the onion and put it in with the mince as it browns, You want to finely chop everything, this isn’t vegetable stew we’re making. Cut the top off the scotch bonnet and deseed it (don’t touch the seeds! If you get your fingers in your eyes they will burn you!) by poking or dragging them out into the bin with a small knife. Finely chop the scotch bonnet (proper finely – you don’t want a chunk of that bad boy turning up), and finely chop the other veggies except for the scallions. Put all of them in the pot with the thyme and the allspice and keep stirring it at a low heat.
Boil up a pint of water, add it to your stock cube. Use lamb stock or beef stock respective of your mince. Add the stock to the saucepan and stir it, wait for the stock to be absorbed before you stop stirring. Add about a cup more water and simmer it until the water has reduced down. Add the scallions and stir them in. Taste it to see if you like it. Cry if you don’t like it. Tell all your friends you have tasty food and they don’t if you do like it. Delight in their dismay. Tell your mum about it and be annoyed as she picks at it whilst you do the next step.
Filling for the patties, simmering away

Filling for the patties, simmering away

Leave the filling to cool down with a lid on it. That won’t stop your mum, but it keeps flies and whatever else out of it. Once it has cooled down, get your dough out of the fridge and unwrap it. Cut the ball of dough into four quarters. Roll one quarter in your hands for a bit until it’s a bit easier to manipulate, but don’t get it hot – hot dough doesn’t like you. Stop beating away your mum’s hand from the pot with your trusty rolling pin and use it to roll the dough with flour underneath and a bit on top of the dough to keep it from sticking. When you roll the dough, turn it around occasionally to stop it from sticking. Roll it to about the thickness of a pound coin. With a quarter of a ball, you should be able to get 5 rounds, but you might have to reroll the bits and bobs. Cut around a saucer with a knife to make a circle of dough. Cut many of these out and put them aside. Put some greaseproof paper onto a baking tray and preheat the oven to 200 degrees C. I’m not sure what this is in gas marks, because we bought a gas oven so we’d have gas marks, and for some reason, it uses temperatures in degrees. I think it might be gas mark six, but don’t quote me on that.
Put a generous dollop of mixture onto a round, just off-center, making sure it doesn’t touch the edge. Dip your fingers (after you’ve washed them, you filthy bastard) into some cold water, and run them around the edge of the round. Fold the round over, press it down a bit to form a seal, then use a fork to secure the seal and make a pattern around the edge. Then use the same fork to poke two holes in the top of the pattie for ventilation purposes. Fans of microwave dinners, you’ll know what I’m talking about. Just don’t stab the shit out of it.
Haha, shit stabber.
Once you’ve got a trayful of patties, get a small pastry brush and brush them with milk or egg. Or both. Just a bit though, you don’t want them being soggy. Slap them in the oven for 20 minutes. Make another trayful whilst you’re waiting. When the patties are cooked, they should be a shiny golden yellow colour. Take them out and they will harden once you leave them to cool down on a wire rack or something. Then eat them. Not all of them, leave some for mum. And that’s all there is to it!
Asher Baker, artisan baker

Asher Baker, artisan baker

Rolling the pastry was the hardest part for me, initially, getting it the right thickness and making sure it didn’t tear because it was too thin. If in doubt, make it a bit thicker than a pound coin to start with, you’ll soon get the hang of it. Remember to clean up once you’ve finished, or else mum will be cross with you. Then take the patties to a Sonic Boom Six gig, and feed them to Laila K to make her fat. The system works.
If you do make these patties, let me know! I would like to know if anyone has any alternative fillings they like to put in! Sometimes I like to use ackee and saltfish instead, but that’s a recipe for another day.
All fruits ripe, Punkchef. Bless.

Read Full Post »

I think it’s only fair that I take a break once in a while, even though this month long (almost) break wasn’t planned, I feel like I’ve earned it. It’s not as if I’ve been resting on my laurels during this break, my dad went into hospital (nothing serious, don’t worry!) so I’ve spent the past fortnight looking after him, as he had tonsils out, I was cooking, but I was cooking mush,  nothing exciting enough to blog about that. So yeah, even though I’ve enjoyed not worrying about cooking something to blog about, it’s nice to be back with a blog!

I didn’t actually expect to be back today, no. Until earlier I had no money, and no food in the house. But my dad decided to bugger off for a bit, and gave me some money to get some food, I hopped into Kirkham, and found there was a farmers and craft market in the square, and had a look around. It was pretty good, a bunch of hippy crap such as dream catchers, and joss sticks, and other crap to make people more spiritual (Ok, I’m a ruddy sceptic, get over it. But joss sticks won’t make you more spiritual, they’ll make your front room smell a bit pleasant after cooking something smelly, but that’s it)

One of the stalls was a greengrocers, a bit of a Del Boy, he bought gold for cash, heh. But on his stall he had 2 things which inspired my recipe tonight, wild garlic, and fresh beetroot! Now then, wild garlic, GET IT WHILST YOU CAN! It only has a season of about 6 weeks, and we’re currently in the 3rd week of the season! So get it whilst you can! It’s not cheap, but if you can forage it, it’s free.

So now I’ve walked the 3 mile hike up and down hills, come home, cooked my tea, and before I settle down to watch Doctor Who, I’ll share my risotto with you!

Beetroot and Wild Garlic Risotto

Ingredients:

  • 4 raw beetroots
  • Handful (6 leaves) of wild garlic
  • 2 onions
  • 250g Risotto rice
  • Splash of white wine, or dry vermouth
  • Chicken or Vegetable stock, kept warm
  • 50g Parmesan Cheese
  • Salt and Pepper
  • 5 Sprigs of Thyme
  • Butter
  • Olive Oil

Method:

  1. Finely slice the onions, and gently sweat in a mixture of butter and olive oil.
  2. Add the thyme and continue to sweat down.
  3. Peel the beetroots, and dice into small cubes. Add the diced beetroot to the pan, and continue to sweat for a further 10 minutes, stirring to make sure nothing sticks to the bottom of the pan.
  4. Add the rice, and stir and gently fry for a few minutes with the onion and beetroot.
  5. Add a splash of white wine into the pan, at this point the kitchen will smell beautiful. I guarantee it.
  6. Turn the heat down to a low simmer, and slowly add the stock, ladle by ladle, stirring constantly, adding a ladle when the stock has been absorbed.
  7. When all the stock has been added to the risotto, the rice is tender, and the beetroot slightly al denté, shred the wild garlic and stir through the risotto.
  8. Grate about 30g of the Parmesan cheese and stir into the risotto.
  9. Serve with an extra grating of Parmesan on the top.

One thing I forgot to get was Lancashire Crumbly Cheese, which is brilliant, crumbled on the top of a beetroot risotto, if slightly unconventional!

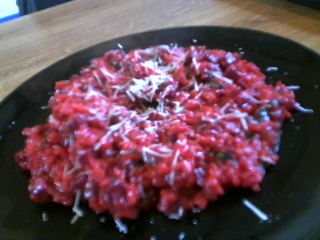
Hooray for pink food!

Hooray for pink food!

Nom

Nom

Read Full Post »

Now, those of you who have been tolerating my irregular postings for a while will remember about 2 weeks ago, I posted a recipe for braised pork cheeks. Well. I’ve only gone and done it again, except this time, I’ve done a different variant on it… after writing up that recipe, I thought… “I bet that’d be good with a nice cider, too”. So I actually did it!

And you know what, it was nice! And this one, well… it’s a little more posh (interesting, the oxymoronic qualities of the word “posh”… nothing that claims to be “posh” is what you would consider “posh”… if you get where I’m coming from?. Like in Preston, there is a laundrette called “Posh Wosh” [sic]. I doubt there’s much “posh” about a laundrette… anyway, I digress…) So here is the recipe, for pork cheeks braised in cider…

Pork Cheeks Braised in Cider

Serves 2

Ingredients :

  • 6 pork cheeks
  • 1 large onion
  • 1 red bell pepper, sliced
  • 10 Chanetnay carrots, peeled and trimmed
  • 1 clove of garlic, minced
  • 1 bottle of dry cider
  • Plain Flour
  • Salt
  • Pepper
  • Saffron

(yeah, saffron, the second most expensive product in the world, beaten only by racing horse semen,.. which I must stress, isn’t a cooking ingredient!)

Method :

  1. Slice the onion into large pieces, and sweat in a large heavy bottomed pan with some vegetable oil.
  2. Add the minced garlic, Chanetnay carrots, and red pepper, and continue to sweat for a further 5 minutes.
  3. Transfer the veg to a bowl.
  4. Mix the flour and salt and pepper, and use to give the pork cheeks a light dusting.
  5. Using the same pan, fry the pork cheeks in some fresh oil, until browned and sealed.
  6. Return the veg to the pan, and then add the cider. I used a huge bottle, so I had enough to drink afterwards, so I only had to use half of it. At this stage, I suggest you eye ball it (no, not the process of taking alcohol through the eye, I’m talking about guessing measurements, you piss head!)
  7. Take a few strands of saffron, and a pinch of salt, and grind in a mortar and pestle, and add to the pan. Also add a few pure strands if you’re feeling extravagant (I was!).
  8. Simmer for about 20 minutes, and then as before, put into an oven proof pot, and transfer to the oven at around 150 degrees Celsius/Gas Mark 4 for around 2 hours.
  9. If the cider hasn’t reduced by much, you can use a buerre manié to thicken it to a more gravy like consistency. Just remember to cook the flour out, before beginning to whisk, otherwise the gravy will have a slightly cloying texture.

It was tasty, if a huuuuge portion

I served mine in a large Yorkshire pudding, and yes. I cheated, and used an Aunt Delia’s Bessie’s Yorkshire Pudding… why? Because I’m lazy. I’ll be honest. Plus, I’m on my own, if I was cooking for company, I’d probably pull my finger out of my arse and make Yorkies myself. But fuck it. Masterchef was on!Yeah, it was good

Anyway, now I finish this blog post, kick back with a cup of coffee and a Bendick’s “Bittermint”, it’s well good. 95% cocoa solids, so lovely rich, mouth filling bitter flavour, with a hugely strong peppermint flavour filling. Good for an indulgent treat… now then, where’s my free chocolates for singing your praises, Bendick’s?

Cheerio!!

P.S. Thanks to Nairn for accepting my offer of a number for his Random Eats blog, he ended up with Sicillian-style Pesto Pasta, not a bad choice really, if I do say so myself!

Read Full Post »

Right then, a few things to cover in this blog post. I’ll cover them in no particular order whatsoever, too!

Firstly is the news that I am going to be on my own this week, my dad is going holiday with his missus and her family, and I opted to stay at home (much more relaxing for me, I’m a fairly quiet person), and this gives me the opportunity to cook some tasty things that I wouldn’t normally get the chance to cook. So I pledge to put up at least three blog posts between Monday and Friday (although, if I’m too busy, I may extend that to include the weekend, to catch up, you know?). I’ve already been shopping, and some ingredients I’ve bought include breast of lamb, pork cheeks, and my personal favourite (purely because I’m rather curious about how they will go down), pig trotters!! Ahh yes, me and my love of offal, eh? I’m also planning on cooking something fishy on Friday, because, even though I’m far from being a Christian, it’s a nice tradition to eat fish on a Friday!

Secondly, I’ve come across a new blog, and I think it’s a good blog, it’s called Random Eats, Nairn (the blogger) bought 11 BBC Good Food cookbooks on Amazon. Upon realising that they just act as dust magnets, he set himself the challenge, of every weekday, having a recipe chosen at random by a colleague or friend, and that night he will cook it, and provide photographic evidence. It’s a fair good read, too!

And, as always, there’s a recipe, for spicy potato wedges. Yeah, it’s a simple one, but it was damn tasty, so I’m going to share the recipe.

Spicy Potato Wedges

Serves 1 as a snack, 2 as part of a main meal

Ingredients :

  • 3 medium sized potatoes, cut into wedges (8 wedges per spud)
  • 2 tbsp sunflower oil
  • 2 tsp crushed garlic
  • 2 tsp smoked sweet paprika
  • 2 tsp chilli powder
  • 1 tsp ground cumin
  • 1 tsp ground black pepper
  • 1 tsp ground sea salt

Method :

  1. Plunge the potato wedges into a pan of boiling water, and par-boil for 10 minutes.
  2. Drain the potato wedges, and put into the pan to cool.
  3. Whilst cooling, mix the remaining ingredients in a bowl.
  4. Coat the potato wedges in the spice and oil mixture, be generous!.
  5. Transfer the potato wedges to a baking sheet, and bake in a pre-heated oven, at 200 degrees Celsius/Gas Mark 6, for roughly 20 minutes.

And, the reason I did this recipe, was because of one of the blog posts on Nairn’s blog, in which his random meal ended up being potato wedges and baked beans. So, I served mine up with some tinned baked beans, although mine were Branston baked beans (the baked beans of kings!!), straight from the tin. Not proper baked beans, lovingly crafted from scratch like his. It was good though. Filled a hole!

Anyway, I’m shooting off, this perry and these doughnuts aren’t going to eat and drink themselves!

Cheerio

Read Full Post »

Yeah, puns are absolutely hillarious. Got to love them.

It’s been a while since I’ve posted up a blog, and I’m sorry, that is incredibly rude of me, and I do apologise. My only excuse is that I’ve been rather pre-occupied with various other projects as of late, and I apologise profusely!!

Right then, I’ll upload a few new recipes over the next few days, I’m still sans-camera, so you’ll have to imagine what the food looks like yourself, but trust me, I won’t post anything on here if it’s not delicious!

A few weeks ago I nipped down to my local Morrissons with £2 to get something to eat for my tea, expecting to maybe pick up a pack of pasta and some sauce, or something equally uninspiring, imagine the surprise when I saw in the reduced section of the supermarket diced venison for only 99p. I rubbed my eyes and looked again, it was still 99p. It still had a week and a half before it reached it’s used by date too!! As you can imagine, I snapped it up, and picked up a leek and some mushrooms whilst I was at it… I had the rest of the ingredients I would need for a delicious Venison and Red Pepper Stew at home! Here we go then!!

Venison and Red Pepper Stew

(Serves 2 as a main meal)

Ingredients:

  • 300g diced venison
  • 2tbsp flour
  • 2tbsp olive oil
  • 1 onion
  • 1 garlic clove
  • 2 red peppers
  • 1 leek
  • 2 large field mushrooms
  • 250ml beef stock
  • 250ml red wine
  • Sprig of thyme

Method:

  1. Pat diced venison dry with kitchen paper and toss with flour.
  2. Heat olive oil in a casserole dish and quickly brown the venison all over.
  3. Add sliced onion and crushed garlic clove until golden.
  4. Add finely sliced red pepper, sliced leek and sliced field mushrooms, and cook until vegetables start to soften.
  5. Pour in the beef stock and red wine, bring to the boil, cover and then leave to simmer gently for about 2 hours, or until the venison is tender.
  6. Alternatively simmer in the oven at 160C/Gas Mark 3 for the same amount of time.
  7. Top up with extra stock or water as necessary.
  8. Serve with mash and steamed brocolli.

I’d recommend drinking this with the same wine that you put in, or a nice ruby ale!

  • 1 leek

Read Full Post »

Offal. I bloody love the stuff. It’s underused, and unfortunately too many people turn their nose up at it. I’m all for the eat every last scrap way of life, not wasting a little bit. It’s got loads of flavour, and best of all… IT’S DIRT CHEAP!! You can pick up sliced lambs liver for less than £1 from a supermarket, and in the case of this recipe, you can get a few lambs hearts for £1.50 in a supermarket, or, speak to your local butcher a few days beforehand, and ask them to get some hearts in for you.

Where was I?… oh, yeah… the recipe, I’ll get right on that.

Lebanese Lemon Lambs Heart

(Serves 2 as a snack/starter, or 1 as a main meal)

Ingredients:

  • 3 lamb hearts
  • Juice and zest of one lemon
  • 5/6 cloves of garlic
  • Olive oil
  • Salt
  • Pepper
  • Pitta Bread

Method

  1. Chop the lamb hearts into small pieces, discarding the tough bits (Look, I never paid attention in biology, and when it came to the lesson where everyone cut up lamb hearts, I was going through a vegetarian period, which lasted about 6 days, so I can’t remember what they’re called!), and put in a bowl.
  2. Add the zest and juice of one lemon to the heart, and a good glug of olive oil, enough to coat the chunks of heart.
  3. Crush all but one of the garlic cloves and add to the meat, along with a good crack of salt and pepper.
  4. Leave to marinade for AT LEAST 2 hours in the fridge.
  5. Throw lamb heart into a very hot frying pan, with a finely chopped/minced clove of garlic, and sautee for about 5 minutes.
  6. Whilst cooking heart, toast a pitta bread.
  7. Slice pitta bread, and spoon lemony heart inside.
  8. Enjoy with a nice glass of red wine.

I suggest you serve this meal to the one you love, what’s more romantic than eating a lambs heart?

Go,… cook!!

Kris

Read Full Post »