Hello and welcome to the second instalment in my week of guest blogs, today we have my favourite London raggapunk, Asher from the Spontaneous Operatic blog, here to share with you food he grew up with, and still makes regularly to this day!
________________________________________________________
Groovin’ out on life: Jamaican Patties
Wow, would you look at that. You’ve just started reading a food blog written by a Northern punk with a palette for absolutely everything (except ready meals), and suddenly this other, completely unknown raggapunk urchin from the dirty South (… alright, London town) rocks up to spoil the party. My name’s Asher, and I’m black. I also like food. Confused yet? You shouldn’t be, really. I’m just guest-blogging as a means of doing something other than soul-destroying exams. Basically, I’m avoiding revision. Fun times.
Well, this week we have a sort of treat for you, I suppose. But it’s not really a treat, because you still have to make it yourself in order to eat it. But it’s quite easy, I mean… I can do it. And I can’t really do much of anything. This recipe is one from my childhood, I might have been born in London, but I’m more cultured than a rastaman wi’ dem drum ‘at inna’ yard drink a Guinness punch. If you didn’t understand that, basically, I can cook all the Jamaican food my mother used to make. And this week, I’ve made some Jamaican patties. Ease up now. Taken from a place even further south than me, Cornwall – the Cornish pasty – the Jamaican pattie is essentially a cross between the pastry Devon wishes it could make and the Caribbean equivalent of a burger. Only, it’s much tastier than both of these. Jamaican patties sell in Caribbean bakeries around the various “black” areas of London (such as Peckham, Brixton and Camberwell) for over £1 a pop. That’s a rip off, don’t pay those prices, you can make 20 or more, depending on how well you can roll the dough, for much less.
Ingredients :
For the pastry :
- 450g Flour
- 255g Butter
- 6tbsp Water
- 3tbsp Ground Turmeric/Haldi
- 2tsp Salt
- 1 egg or 100ml milk
For the filling :
- 500g Mince (can be beef or lamb, I prefer lamb but I use beef because it doesn’t go stodgy and fatty when cold.)
- 2 Pointed peppers (or several baby peppers – sweeter the better)
- 1 Scotch bonnet chilli pepper (I sometimes use two, depends on how spicy you like it.)
- 1 Large onion
- 1 Garlic clove
- 3-4 Scallions (Spring Onions)
- Sprigs of thyme
- Allspice/pimento seeds (I have them in a grinder)
- Stock cube
- 1 pint boiling water
- Tomatoes
- 3tbsp olive oil
Some things I add sometimes :
- Grated root ginger
- Jerk seasoning
- Grated sweet potato
Method : (Delivered in Asher’s unique style!, Kris)
So, what you want to do after washing your hands is measure out your flour and add the turmeric and salt to it. Then sift it to get rid of the lumps. Leave the butter to rest on the side until it’s a bit softer, then cube it and add it to the flour mix. You can either work through it with your hands repeatedly (squeeze!) or you can be lazy and use a food processor. After I started making these at ridiculously industrial levels (I’m lying.. about 40 at a time), I started to favour the food processor, and it does get the pastry to a nice consistency. Once you’ve worked the flour and butter into breadcrumbs, add your water a bit at a time and knead it until it all sticks together. Or just add the water and blitz it in your food processor. Either way, if you find it’s too sticky, add some more flour, a bit at a time. If you find it’s not sticking together, slowly add some more water. Once it is ready, you’ll notice the ball of dough is a yellow colour. That’s the turmeric. It’s how people can tell you’ve made Jamaican patties, and not Cornish pasties. Racist? I think so. Wrap the dough up in clingfilm and put it in the fridge whilst you get on with this next bit.

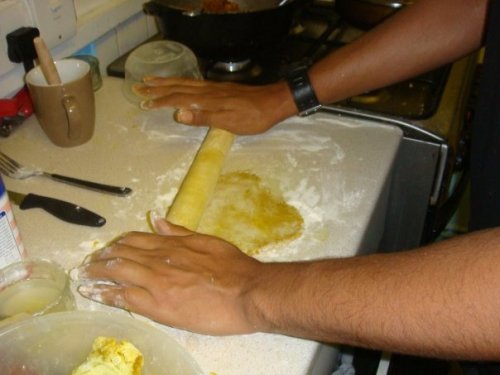
This is how the pastry should look when rolled out
You’ll wanna’ clean the side and dry it – it will need to dry completely whilst your dough is standing in the fridge so that none of it gets stuck when you’re rolling it later. Oh, I forgot everyone else has massive kitchens with more than one side to use. Nevermind. What you’ll want to do next is heat your oil in a pan (I prefer a proper saucepan, you can do it in a frying pan or wok, but if you’re anything like me, it will fall out over the sides later). Once it’s smokin’ a lickle bit, reduce the heat and break up your mince. Put it in the pan. Hear that sizzle? Cry as it spits at you, then turn the heat down some more because that means it’s too high. Break up the mince in the pan with a spatula, make sure none of it clumps together – rubbery mince is horrible. Brown the mince slowly, but whilst keeping a close eye on it, chop up the onion and put it in with the mince as it browns, You want to finely chop everything, this isn’t vegetable stew we’re making. Cut the top off the scotch bonnet and deseed it (don’t touch the seeds! If you get your fingers in your eyes they will burn you!) by poking or dragging them out into the bin with a small knife. Finely chop the scotch bonnet (proper finely – you don’t want a chunk of that bad boy turning up), and finely chop the other veggies except for the scallions. Put all of them in the pot with the thyme and the allspice and keep stirring it at a low heat.
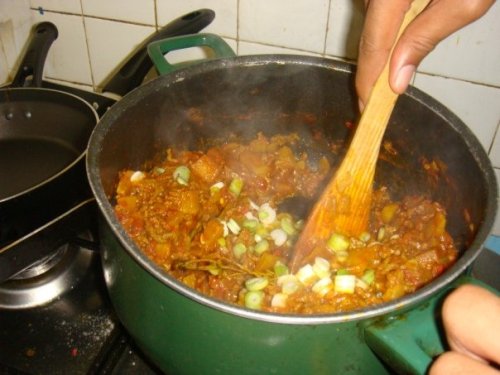
Boil up a pint of water, add it to your stock cube. Use lamb stock or beef stock respective of your mince. Add the stock to the saucepan and stir it, wait for the stock to be absorbed before you stop stirring. Add about a cup more water and simmer it until the water has reduced down. Add the scallions and stir them in. Taste it to see if you like it. Cry if you don’t like it. Tell all your friends you have tasty food and they don’t if you do like it. Delight in their dismay. Tell your mum about it and be annoyed as she picks at it whilst you do the next step.

Filling for the patties, simmering away
Leave the filling to cool down with a lid on it. That won’t stop your mum, but it keeps flies and whatever else out of it. Once it has cooled down, get your dough out of the fridge and unwrap it. Cut the ball of dough into four quarters. Roll one quarter in your hands for a bit until it’s a bit easier to manipulate, but don’t get it hot – hot dough doesn’t like you. Stop beating away your mum’s hand from the pot with your trusty rolling pin and use it to roll the dough with flour underneath and a bit on top of the dough to keep it from sticking. When you roll the dough, turn it around occasionally to stop it from sticking. Roll it to about the thickness of a pound coin. With a quarter of a ball, you should be able to get 5 rounds, but you might have to reroll the bits and bobs. Cut around a saucer with a knife to make a circle of dough. Cut many of these out and put them aside. Put some greaseproof paper onto a baking tray and preheat the oven to 200 degrees C. I’m not sure what this is in gas marks, because we bought a gas oven so we’d have gas marks, and for some reason, it uses temperatures in degrees. I think it might be gas mark six, but don’t quote me on that.
Put a generous dollop of mixture onto a round, just off-center, making sure it doesn’t touch the edge. Dip your fingers (after you’ve washed them, you filthy bastard) into some cold water, and run them around the edge of the round. Fold the round over, press it down a bit to form a seal, then use a fork to secure the seal and make a pattern around the edge. Then use the same fork to poke two holes in the top of the pattie for ventilation purposes. Fans of microwave dinners, you’ll know what I’m talking about. Just don’t stab the shit out of it.
Haha, shit stabber.
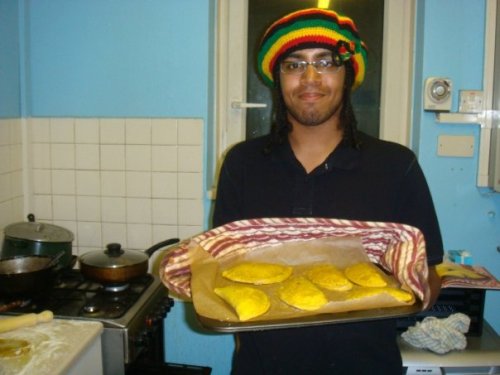
Once you’ve got a trayful of patties, get a small pastry brush and brush them with milk or egg. Or both. Just a bit though, you don’t want them being soggy. Slap them in the oven for 20 minutes. Make another trayful whilst you’re waiting. When the patties are cooked, they should be a shiny golden yellow colour. Take them out and they will harden once you leave them to cool down on a wire rack or something. Then eat them. Not all of them, leave some for mum. And that’s all there is to it!

Asher Baker, artisan baker
Rolling the pastry was the hardest part for me, initially, getting it the right thickness and making sure it didn’t tear because it was too thin. If in doubt, make it a bit thicker than a pound coin to start with, you’ll soon get the hang of it. Remember to clean up once you’ve finished, or else mum will be cross with you. Then take the patties to a Sonic Boom Six gig, and feed them to Laila K to make her fat. The system works.
If you do make these patties, let me know! I would like to know if anyone has any alternative fillings they like to put in! Sometimes I like to use ackee and saltfish instead, but that’s a recipe for another day.
All fruits ripe, Punkchef. Bless.
Read Full Post »


